Tutorial: Make ShareScope your own
In this tutorial we will look at customising the toolbars and menus and creating your own keyboard shortcuts.
Toolbars
There are three main toolbars visible by default in all ShareScope versions. These are the:
Main toolbar:
(Gold)

(Plus/Pro)

Settings toolbar:
(Gold)

(Plus/Pro)

Graph toolbar: (actually displayed vertically on the right hand side of your screen)
Note: The buttons will be greyed out if you do not have a graph window selected.

Customising toolbars
You may find that you do not use all of the buttons on the toolbars provided, and that, in fact, there are other buttons that you would prefer to have on the toolbars instead. You can control which buttons are displayed and where they appear on the toolbars. Let's look at adding a button to the Main toolbar so we can quickly access the list of FTSE100 shares.
To change a toolbar, right click on any of the buttons on the toolbar you want to change and select "Customise Toolbars"

The following dialog is displayed:

The dialog in ShareScope Gold does have subtle differences, including the lists that are available and the "Active" option on the left.
Note that the selected toolbar is highlighted on the left.
In all versions of ShareScope though, with this dialog open you should see the "Add a list button (for any list or custom list" option in the middle window. Select this item. The window on the right shows the buttons already on the toolbar. Scroll down until you can see "Connect to Level 2 feed" and select this as well - your dialog should now look something like this:
Now click on the arrow button that you see outlined in red above. This will move our new list item into the right hand window, below the ?Connect to Level 2 feed" item; thus the reason for selecting the "Connect to Level 2 feed" item. If you did not select this, or selected the wrong item in the right window, you can still change the position of the item on the toolbar by using the Arrow or Arrow buttons.
You will then need to define the list button and what it will be linked to. This is done by clicking on the ?Links to? drop down and selecting a list which in this example is the ?FTSE 100? as seen below.

Before you close this dialog, have a look at the toolbar and check that the button is there and is where you want it to be. Click on OK to confirm the changes you have made, or click Cancel if you do not want to keep your changes.
There are many more buttons that you can add - have a look at the options available under each tab to find the items that you use most often. Use the Arrow button to remove any items from the toolbar that you do not want.
You can also customise the buttons further by removing the text or icon from the button and you can add colour flags to List buttons. The five buttons below demonstrate five different ways of customising a list button:

On the Settings tab you will find further options to customise the position of the selected bar, the icons and text and the size of the buttons. In ShareScope Gold you can also select on which screens you want to see specific toolbars (this is how the Graph bar only appears when on a graph screen).
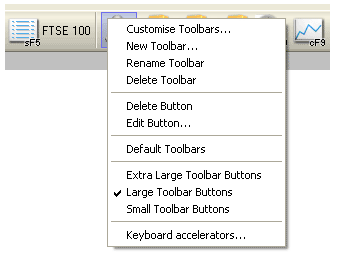
When you right click on any of the toolbars, from the Toolbar context menu you will see some further options that are available:
You can Delete any individual button from a toolbar by right clicking on the button you want to remove and then select Delete Button. The Edit Button option allows you to customise an individual buttons display properties in relation to the Icon and Text and any mnemonic or colour flashes if selecting a list button.
If you make changes to the toolbars, or if you lose any toolbars, you can revert to the Default Toolbars supplied when you first install ShareScope by selecting this item from the menu.
There are also three toolbar button sizes available - choose the best to suit your screen size and eyesight.
Keyboard accelerators
In ShareScope there are a number of preset keyboard accelerators or shortcuts. These include the Enter and Esc keys to cycle through the main views available in ShareScope - the List Table, Historical Graph, Intraday Graph (Plus/Pro) and Details page.
Press the \ key for news on the selected share, the > key for the company's key dates or / for a historical price list. The F9 key runs the end of day update; F11 displays your current portfolio list; + displays the transactions page for the current portfolio; and F12 allows you to select a new portfolio to view or create. The TAB key is a new shortcut that restricts your current list to shares making a new high, then a new low, then shows the full list again.
You can add your own keyboard accelerators for certain actions in ShareScope. Let's create a shortcut for drawing a circle on a graph. As you can see from the image above, you can right click on a toolbar to access the Keyboard accelerators option from the menu, or go to the Tools menu at the top of your screen for the same option. The following dialog is displayed:

Click on the Graphs tab at the top and scroll down until you can see and select the "Draw circle" option.

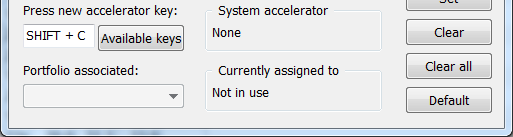
Without clicking anywhere else, press the Shift and C keys on your keyboard (you could choose a different combination, this is only an example). You will see these appear in the dialog:

This combination is not currently in use so is available to use on this action. Click on the Set button and then click on OK to close the dialog.
If you then go to a Graph screen and press Shift and C together you will then be able to left click and drag on the graph to draw a circle. Without having this keyboard accelerator in place, in order to draw a circle you would have to right click in the graph, go to Lines and Text and then select Draw a Circle.
Remember, if you have any trouble finding or using any of these features, please don't hesitate to contact our Customer Support team. They will be delighted to help.